Motivation and Context
The motivation behind writing most of my blogs is to document my experiences as I try things out, both for myself and for anyone else who might find them useful.
For this blog, the main reason for writing a full article is that when I was searching for resources and examples on creating a basic MongoDB Atlas serverless cluster using CDK, I couldn’t find much to reference. Another motivation is troubleshooting. I was encountering numerous “unrecognized resource types” errors but had very little or no clue about what was actually causing them! What started as an exciting prospect quickly turned into a frustrating hunt for answers.
As part of one of our recent projects, we decided to use the following tech stack:
- Node.js with TypeScript
- MongoDB
We chose to create a MongoDB Atlas serverless cluster from a cost-optimization perspective, as we anticipated relatively low data frequency and associated transfers. Running a dedicated cluster for such a low-volume workload wasn’t justified. A dedicated M10 instance (10GB storage, 2GB RAM, 2 vCPUs, $0.08/hr) would cost us around $60 per month.
As a bootstrap exercise, I started exploring documentation and examples to create an Atlas serverless cluster, which our service would connect to using the MongoDB connection URL: mongodb+srv://. Our service was built in TypeScript, leveraging Apollo GraphQL and MongoDB. We use CDK (TypeScript) as an IaC tool to create service infrastructures. However, for simplicity and demonstration purposes, this post will use a basic HTTP server written in TypeScript alongside an Atlas serverless cluster deployed with CDK in TypeScript.
Challenge of Secure Connectivity
Working with MongoDB Atlas, the default connection setup involves whitelisting IP addresses. For local development and testing, this is easy enough — you add your current or VPN IP, connect, and you’re good to go. But in a production environment, it’s recommended to use as secure connection as possible. To validate service connectivity with mongo I’ve tested both standard connection and private endpoint. In private endpoint connection database traffic would never leave the AWS network.
Project Setup
Example working code can be found in my github repo. Let’s quickly look at the project structure which basically has two main directory:
- cdk - contains infrastructure code for creating a mongo atlas serverless cluster and ecs cluster
- src - contains a simple http server that connects to a mongo atlas serverless cluster via
mongodb+srv://uri passed as env variable.
Prerequisite
- MongoDB account with either the
Project OwnerorOrganization Ownerrole in Atlas - AWS user account with preferably admin access
- VPC
- AWS CLI (
brew install awsclifor mac user)
Create Atlas Serverless Cluster
Before we can run the application locally to test the MongoDB connection, we need to create an Atlas serverless cluster. Since we are using CDK to create the cluster, we need to generate an API key with the`Project Cluster Manager role, which will be used to programmatically create the cluster.
Create Mongo API Key
- Login to cloud.mongodb.com
- Access Manager -> Select desired project.
- Access Manager -> Create Application -> API Key.
- Follow on-screen instructions (assign correct scope to the key).
- Save the public and private keys securely (it is recommended to store them in AWS Secrets Manager).
Create Serverless Cluster
Before creating the cluster make sure following third party public extensions (aws console -> cloudformation -> public extensions; under registry) are activated in your AWS account. Specially ensure that MongoDB::Atlas::ServerlessInstance is activated, as it took me quite a while to figure out that without this extension enabled, cluster creation will fail, and CDK will provide a very vague error message e.g. ❌ Deployment failed: Error [ValidationError]: Template format error: Unrecognized resource types: [MongoDB::Atlas::Project, MongoDB::Atlas::ServerlessInstance, MongoDB::Atlas::DatabaseUser, MongoDB::Atlas::ProjectIpAccessList]!
- MongoDB::Atlas::APIKey
- MongoDB::Atlas::Cluster
- MongoDB::Atlas::DatabaseUser
- MongoDB::Atlas::ProjectIpAccessList
- MongoDB::Atlas::ServerlessInstance
- MongoDB::Atlas::PrivateEndpointService
Following commands will help create mongo-atlas-sls-cluster cloudformation stack.
# move to cdk directory and install dependencies
$ yarn install --frozen-lockfile

# list available stack
$ yarn cdk list
$ yarn cdk synth QaMongoAtlasSlsClusterStack
$ yarn cdk deploy QaMongoAtlasSlsClusterStack
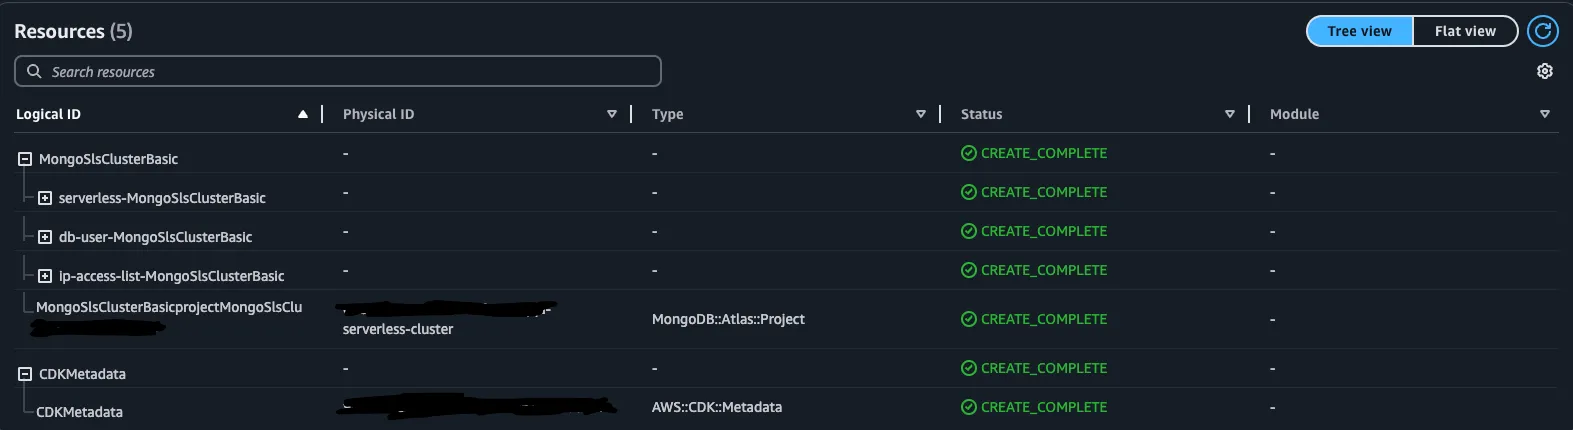
If everything goes as expected, this should create a cloudformation stack with resources similar to the following:
Database user and Private Endpoint
Now that our serverless cluster is created, let’s create a database user&password and set up a private endpoint between MongoDB and AWS. This will allow us to use the private endpoint URL to securely connect to our cluster.
Database User
- Select your cluster (e.g. bytedb-sls in my case)
- Database Access -> Add new database user
- Select a username, password, and roles (e.g. dbAdmin in my case)
- Add user
Private Endpoint
- Select your cluster (e.g. bytedb-sls in my case)
- Network Access
- Private Endpoint -> Serverless Instance tab -> Create new endpoint
- Follow on-screen instructions (e.g. vpc ID, private subnet IDs, execute aws cli command etc) to complete the setup.
- Once done, wait a few minutes for both the
EndpointandEndpoint Servicestatuses to become available on both sides.
Test locally
Now that the cluster is ready, we can test connectivity between our application server and the database.
- Rename or make a copy (
cp .env.sample .env) of.env.sample->.env - Select you cluster -> Click on connect -> Choose Standard Connection -> Choose Drivers as Connection method
- Copy the connection string provided
- Replace <db_password> with the password when database user was created.
- Paste the whole string in
.envfile as the value of theMONGO_URIkey..envfile should look like below:MONGO_URI=mongodb+srv://example-user:example-password@bytedb-sls.example.mongodb.net/?retryWrites=true&w=majority&appName=bytedb-sls
# Install dependencies of the project
$ yarn install --frozen-lockfile
$ yarn start
If server successfully connects to the database you should see a console log similar to the following:
Successfully connected to mongo
🚀 Server running at http://0.0.0.0:4000
Deploy ECS Fargate to AWS
Now that our database cluster is up and running, let’s deploy our ECS Fargate service to AWS and check if our application can successfully connect to the database.
But before we do that, we need to prepare a few things beforehand.
- Create a private endpoint string exactly as described above (cluster -> connect -> Choose Private endpoint -> Drivers).
- Save private endpoint string as a aws secret.
- Pass aws secret arn as a stack props value here which will be retrieved and unwrapped as the value of the MONGO_URI environment variable.
Similar to local test, if server deployed as fargate container successfully connects to the database you should see a cloudwatch log similar to the following:
Successfully connected to mongo
🚀 Server running at http://0.0.0.0:4000
Debugging Connectivity Issues
- When testing the connection locally, ensure that your local IP address or VPN (if you’re using one) is whitelisted in the MongoDB network access list.
- Ensure that your private endpoint configuration is complete on both the AWS and MongoDB sides.
- When testing the connection from the Fargate application, verify that your security groups/VPC allow the necessary traffic to the private endpoint that was created earlier. AWS Network Manager’s Reachability Analyzer can be used to check if there is a reachable route (source:
eniIDattached to the Fargate task, destination:VPC endpoint ID). - Any misstep could send you down a rabbit hole!